nf-core/panoramaseq















Introduction
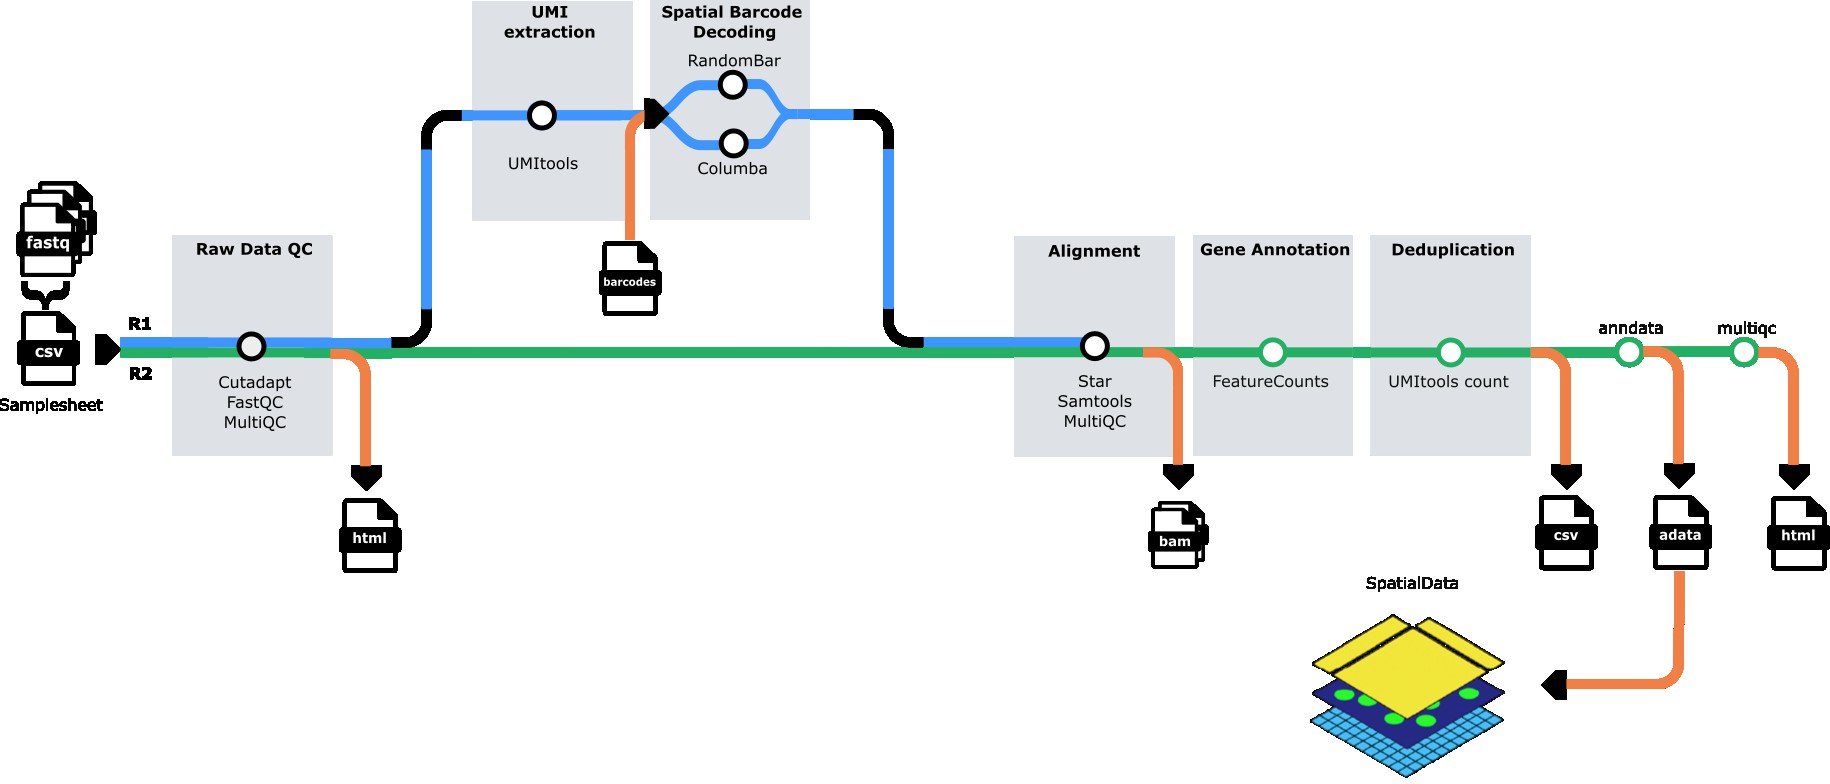
nf-core/panoramaseq is a bioinformatics pipeline for processing sequencing-based spatial transcriptomics data from in-situ arrays. The pipeline performs quality control, barcode calling, UMI extraction, read alignment, feature quantification, and generates analysis-ready AnnData (H5AD) files for downstream spatial transcriptomics analysis.
The pipeline handles paired-end FASTQ files from spatial transcriptomics experiments, performs GPU-accelerated barcode identification using QUIK, quantifies gene expression with UMI deduplication, and outputs spatially-resolved count matrices in H5AD format compatible with popular single-cell analysis tools like Scanpy and Seurat.
Pipeline summary
- Quality Control - Raw read QC (
FastQC) - Subsampling (optional) - Downsample reads for testing (
seqtk) - Barcode Calling - GPU-accelerated spatial barcode identification (
QUIK) - UMI Extraction - Extract UMI sequences from reads (
UMI-tools) - Adapter Trimming - Multi-stage adapter and quality trimming (
Cutadapt) - Read Alignment - Align reads to reference genome (
STAR) - Feature Quantification - Assign reads to genes (
featureCounts) - UMI Counting - Deduplicate and count UMIs per gene (
UMI-tools) - H5AD Generation - Create spatially-resolved count matrices (
AnnData) - H5AD Validation - Validate output files (custom validation)
- Quality Reports - Aggregate QC metrics (
MultiQC)
Usage
Note
If you are new to Nextflow and nf-core, please refer to this page on how to set-up Nextflow. Make sure to test your setup with -profile test before running the workflow on actual data.
Samplesheet input
You will need to create a samplesheet with information about the samples you would like to analyze before running the pipeline. Use this parameter to specify its location with --input.
The samplesheet has to be a comma-separated file with 5 columns and a header row as shown in the example below:
sample,fastq_1,fastq_2,N_barcodes,barcode_file
SAMPLE_1,/path/to/sample1_R1.fastq.gz,/path/to/sample1_R2.fastq.gz,34500,/path/to/barcodes_coords.csv
SAMPLE_2,/path/to/sample2_R1.fastq.gz,/path/to/sample2_R2.fastq.gz,34500,/path/to/barcodes_coords.csv
| Column | Description |
|---|---|
sample |
Custom sample name. This will be used to name all output files. Spaces are not allowed. |
fastq_1 |
Path to FASTQ file for read 1. File must be gzipped and have the extension .fastq.gz or .fq.gz. |
fastq_2 |
Path to FASTQ file for read 2. File must be gzipped and have the extension .fastq.gz or .fq.gz. |
N_barcodes |
Number of expected spatial barcodes for this sample (e.g., 34500 for standard arrays). |
barcode_file |
Path to CSV file containing spatial barcode sequences and their coordinates. Must include barcode sequences in column 1. |
An example samplesheet has been provided with the pipeline.
Reference genome
The pipeline requires a reference genome and annotation files. You can specify these in multiple ways:
Option 1: Provide pre-built STAR index
--star_genome_dir /path/to/star_index/
--star_gtf /path/to/annotation.gtf
Option 2: Build index from FASTA and GTF
--fasta /path/to/genome.fasta
--star_gtf /path/to/annotation.gtf
The pipeline will automatically build the STAR index from the provided FASTA file.
Option 3: Use iGenomes reference (if configured)
--genome GRCh38
Running the pipeline
The typical command for running the pipeline is as follows:
nextflow run nf-core/panoramaseq \
   --input samplesheet.csv \
   --outdir results \
   --star_genome_dir /path/to/star_index \
   --star_gtf /path/to/annotation.gtf \
   -profile singularity
This will launch the pipeline with the singularity configuration profile. See below for more information about profiles.
GPU Requirements and Configuration
The pipeline uses GPU-accelerated barcode calling via QUIK, which requires NVIDIA GPUs and CUDA libraries. You must configure GPU settings by modifying the pipeline's nextflow.config file to match your system.
For UGent HPC Users (Joltik/Accelgor clusters)
Step 1: Set up environment variables (add to your ~/.bashrc or run before each session):
export NXF_HOME=$VSC_DATA_VO_USER/.nextflow
export APPTAINER_CACHEDIR=$VSC_SCRATCH_VO_USER/.apptainer/cache
export APPTAINER_TMPDIR=$VSC_SCRATCH_VO_USER/.apptainer/tmp
export SINGULARITY_CACHEDIR=$VSC_SCRATCH_VO_USER/.apptainer/cache
Step 2: Modify the pipeline's nextflow.config file by adding this GPU configuration at the end:
# Navigate to the pipeline directory
cd /path/to/nf-core-panoramaseq

# Edit nextflow.config and add the following at the end of the file:
// GPU configuration for UGent HPC (Joltik/Accelgor)
process {
    withLabel: use_gpu {
        beforeScript = 'module load cuDNN/9.5.0.50-CUDA-12.6.0'
        clusterOptions = { "--gpus=1 --clusters=joltik,accelgor" + (System.getenv("SBATCH_ACCOUNT") || System.getenv("SLURM_ACCOUNT") ? " --account=" + (System.getenv("SBATCH_ACCOUNT") ?: System.getenv("SLURM_ACCOUNT")) : "") }
    }
}
Step 3: Run the pipeline:
nextflow run main.nf \
   --input samplesheet.csv \
   --outdir results \
   --star_genome_dir /path/to/star_index \
   --star_gtf /path/to/annotation.gtf \
   -profile vsc_ugent,singularity
For Other HPC Systems
Step 1: Check available CUDA modules:
module spider CUDA
module spider cuDNN
Step 2: Modify the pipeline's nextflow.config file by adding GPU configuration at the end:
# Navigate to the pipeline directory
cd /path/to/nf-core-panoramaseq

# Edit nextflow.config and add this at the end:
// GPU configuration for your HPC system
process {
    withLabel: use_gpu {
        // Load your system's CUDA module (CUDA 12.6.0 or compatible)
        beforeScript = 'module load CUDA/12.6.0'  // Adjust version for your system

        // Configure GPU allocation for your scheduler (SLURM example)
        clusterOptions = '--gpus=1'  // Adjust for your scheduler (PBS/SGE/etc)

        // Enable GPU access in containers
        containerOptions = {
            workflow.containerEngine == "singularity" ? '--nv' :
            ( workflow.containerEngine == "docker" ? '--gpus all': null )
        }
    }
}
Step 3: Run the pipeline:
nextflow run main.nf \
   --input samplesheet.csv \
   --outdir results \
   --star_genome_dir /path/to/star_index \
   --star_gtf /path/to/annotation.gtf \
   -profile singularity
Important Notes
- The QUIK container is pre-built with CUDA 12.6.0 runtime
- Your system must have CUDA drivers version 12.6 or higher
- Add the GPU configuration to the end of the pipeline's
nextflow.configfile (this overrides institutional defaults) - GPU jobs will be scheduled on GPU-enabled nodes based on your
clusterOptions - The pipeline requires at least 1 GPU for QUIK barcode calling
Execution Profiles
The pipeline requires Singularity/Apptainer for QUIK barcode calling due to the GPU-accelerated pre-built container requirement.
Singularity Profile (Required for QUIK)
nextflow run main.nf --input samplesheet.csv -profile singularity
Requirements:
- ✅ Singularity/Apptainer container engine
- ✅ NVIDIA GPU with CUDA support
Advantages:
- ✅ Fast GPU-accelerated barcode calling (~0.75ms per read)
- ✅ Consistent environment across systems
- ✅ No compilation overhead
- ✅ Recommended for HPC systems
QUIK Performance:
- Compiled with:
SEQUENCE_LENGTH=36,REJECTION_THRESHOLD=8 - Performance: ~0.75ms per read on NVIDIA Tesla V100 GPU
- ~10-20x faster than runtime compilation
Docker Profile
nextflow run main.nf --input samplesheet.csv -profile docker
Notes:
- Uses same pre-built QUIK container as Singularity profile
- Requires Docker daemon and GPU plugin for GPU access
- Not recommended for HPC systems (Singularity preferred)
Combined Profiles
You can combine profiles for your specific setup:
# UGent HPC with GPU (recommended)
nextflow run main.nf -profile vsc_ugent,singularity

# Generic HPC with GPU
nextflow run main.nf -profile singularity

# Test run with singularity
nextflow run main.nf -profile test,singularity
Key parameters
Subsampling
To subsample FASTQ files for faster testing or analysis:
--sample_size 400000 # Subsample to 400,000 reads per file
QUIK barcode calling
The pipeline uses GPU-accelerated QUIK for fast and accurate barcode calling via the pre-built Singularity container.
Container:
- Pre-built container:
oras://quay.io/francoaps/quik-cuda:prebuilt-36bp-v2 - Base: NVIDIA CUDA 12.6.0 on Ubuntu 22.04
- Engine: Singularity/Apptainer (required)
Fixed parameters (compiled at container build time):
barcode_length: 36bp (compiled withSEQUENCE_LENGTH=36)rejection_threshold: 8 (compiled withREJECTION_THRESHOLD=8)
Configurable parameters (set at runtime):
--barcode_start 9                        # Start position of barcode in read (default: 9)
--strategy '4_7_mer_gpu_v1'              # Barcode matching strategy (default: 4_7_mer_gpu_v1)
--distance_measure 'SEQUENCE_LEVENSHTEIN' # Distance metric for matching (default: SEQUENCE_LEVENSHTEIN)
Performance:
- ~0.75ms per read on NVIDIA Tesla V100 GPU
- Optimized with pre-built binary in container
Requirements:
- NVIDIA GPU (Tesla V100 or equivalent)
- Singularity/Apptainer container engine
- CUDA drivers 12.6 or compatible
If you need different barcode length or threshold:
- You must rebuild the container from the Singularity definition file (
containers/quik_cuda_prebuilt.def) with different compile-time parameters - The pre-built binary cannot be reconfigured at runtime
UMI tools
Configure UMI extraction:
--umitools_bc_pattern 'NNNNNNNNN'     # UMI barcode pattern (default: 9 N's)
--umitools_extract_me